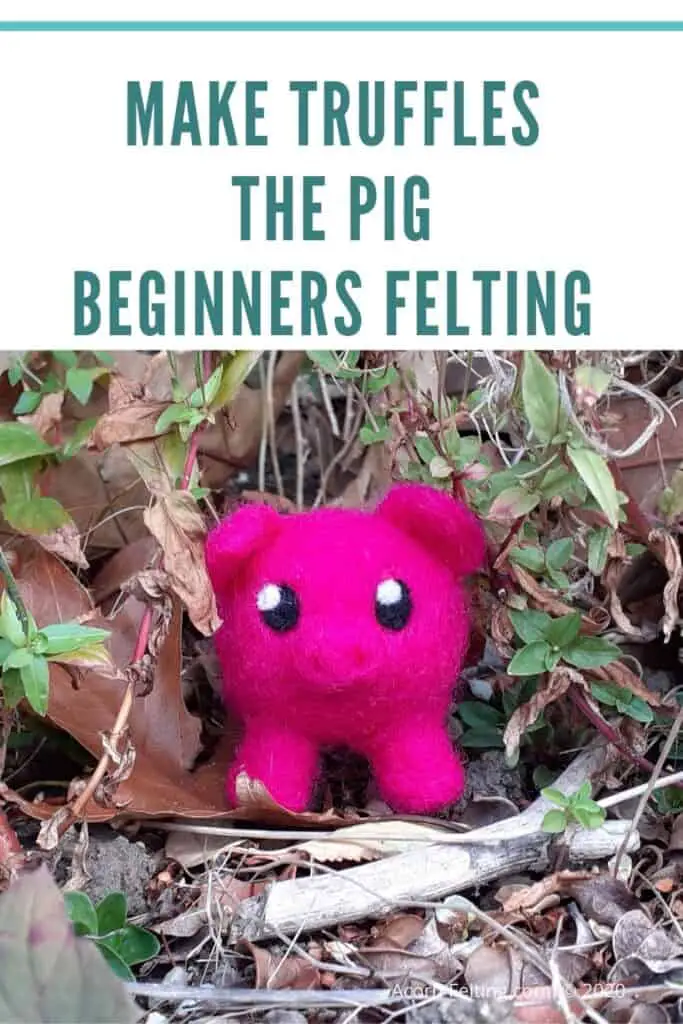
Create this cute felted pig with this easy needle felted pig tutorial for beginners. It builds on basic felting knowledge so that you can start to create your own things.
To create your needle felted pig you need to have your basic felting tools, needles, mat, and wool. You first create a ball, then four open-ended cones and one small cone, two triangles, and put them together to form your pig.
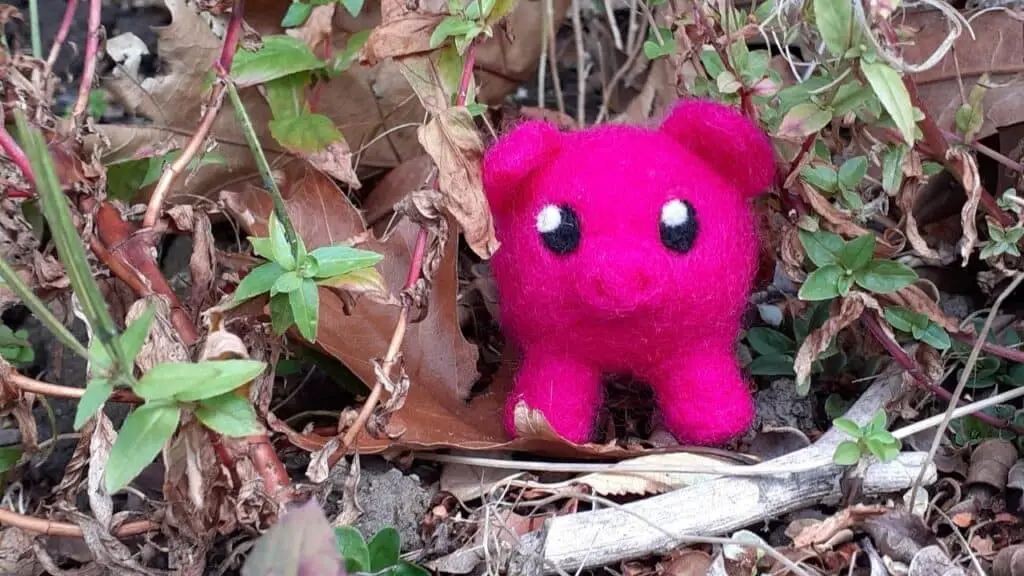
If you want to create a cute pig like Truffles, you can follow the tutorial below it shows you step by step how to do it including pictures.
How To Needle Felt a Pig
This fun pig tutorial puts together the parts you have learned in the basics tutorials to create a needle felted pig.
Truffles the Pig is designed for those who have followed my how to make a ball and cone tutorials. Don’t worry if you haven’t, you can either do them here or just do Truffles, All you need to know is included in this tutorial.
The aims of this tutorial are:
- To use your knowledge of creating a ball and a cone to create a pig.
- In addition, you will learn how to create flatter pieces.
- A small amount of 2D felting is introduced.
- Learn to create simple joins in felting to create more complex creations.
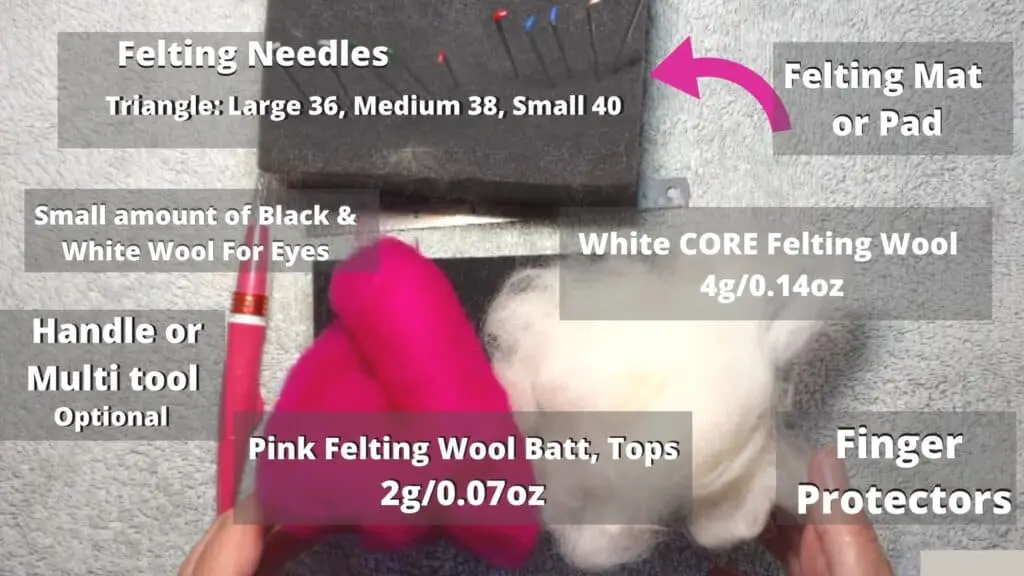
Tools for this Project
- Needle felting needles large medium & Small
- Felting Mat
- Finger Protectors
Materials for This Project
- Core Wool (white)
- Pink batting (you can also use tops/roving/or sivers if you have those)
- Black wool (only a small amount for the eyes)
- White wool (for the eye highlights if using)
- Plastic eyes as an alternative (optional)
Felt the Pigs Body
To create the truffles the pigs body:
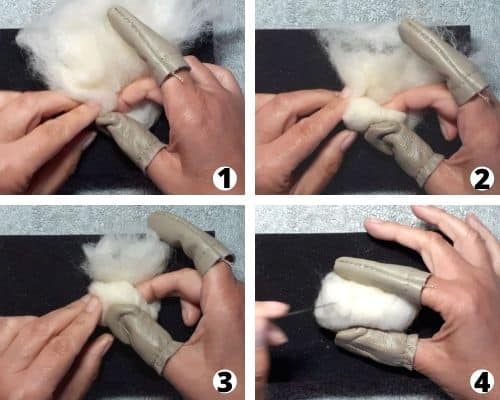
- Take your core wool (or colored if not using core)smooth is out so you can roll it up. Take one end and tuck it in.
2. Tuck and roll as you go. The aim is to create a ball/oval shape.
3. Continue to roll until you get to the end and have used all your wool
4. Pin the edges to the ball with your needle. This stops it unravelling.
5. Create a ball felt all round with a larger needle (36 or 38) or your multi tool until you have a ball shape.
6. Make sure you work all the way around your shape to create an even ball.
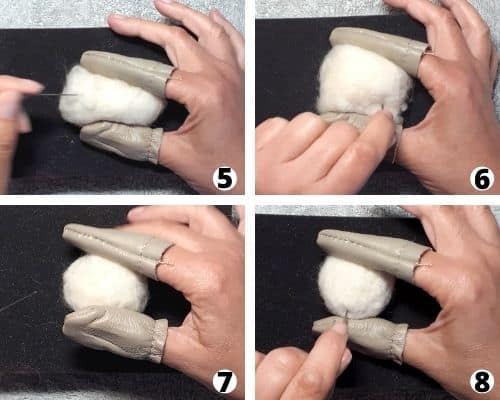
7. Gently squeeze your ball. If it has a lot of give and is too soft continue to felt.
8. You want your ball to be firm enough that it is a ball but not too firm as you have your color to put on top of it.

9. If you are using colored wool add it to your ball. To do this tear off a piece of wool and place it onto your ball.
10. Attach it to the ball using your needle. If you cannot use your large needle drop a needle size.
11. fold over the ends and felt with your needle.
12. Make sure you have the whole of your ball evenly covered in your color with no core wool showing through.
At this stage, your ball should be firm but still workable. You should be able to use your needle without struggling but the ball should be firm, not floppy. You will be adding parts to it and it needs to be firm for them to stay in well.
Put the body to one side for now. Now you are going to do the legs.
Felt the Pigs Legs x 4
Truffles will need 4 legs. To make the legs you need to pull enough wool for all 4 legs. Try to keep each of the pieces as evenly sized with the others as possible.
What you are aiming for is 4 cones. If you have created cones before you can create the legs. They are more rounded than cones at the narrow end.
The difference is the wide end of the cone needs to remain unfelted. This is the part you attach to the body. If you felt them it will be harder to attach them.
Make sure you work all 4 legs simultaneously.
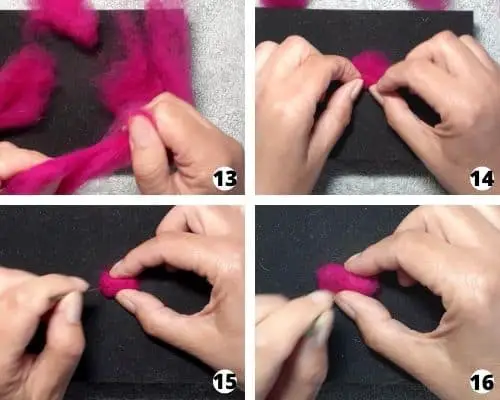
13. Take 4 evenly pulled pieces of wool slightly larger than you need for your final legs.
14. Roughly form them into a flat semicircle. Roll them up to form 4 cone shapes and join the ends of each with your fleeting needle to secure.
15. Start to felt them to create cone shapes.
16. Felt them loosely at this stage. Make sure you work them together to make sure they are about the same size. Remember to leave the large end of the cone unfelted.
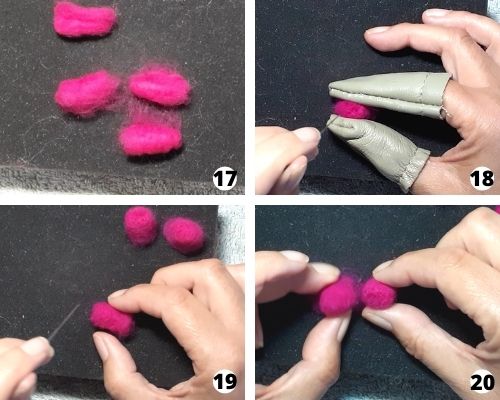
17. You should now have 4 loose shapes. Check them over to make sure they are all about the same thickness and size.
18. continue to felt, remember to felt the ends as well.
19. Continue to felt all the cones together checking as you go.
20. Now they are fairly firm you will have a better idea of the final sizes. Make any adjustments to your cones and add wool if needed.
You should now have 4 legs with loose wool one end.
Attach The legs to the Body of Your Pig
This is the exciting part, your pig will start to come together now.
Now that you have 4 evenly sized legs it is time to attach them to the body.
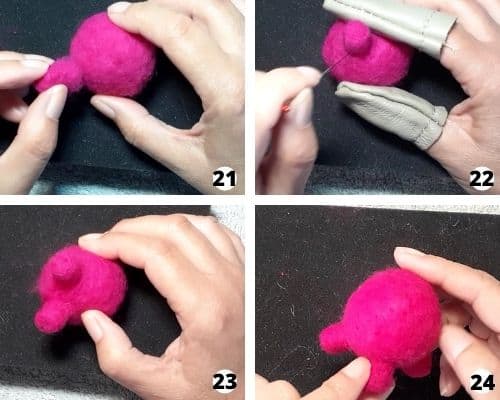
21. Take your body and the legs and decide which part of the ball you want as the top and the bottom. Decide where you want to position the legs.
For my pig I have positioned the legs slightly splayed out to allow my pig to stand more easily.
22. Take one of the legs, position it to where you want it and lightly attach it to the body. Do not felt it firmly at this stage. You want to be able to move it if you are not happy with it.
23. Repeat this with the remaining three legs.
24. Now you should have 4 legs light attached to the body all facing downward. Check to see if you are happy with how they look. If you are happy then you can start to felt them to the pigs body more firmly. If you are not now is the time to remove them and rearrange them.
Make sure you work on all 4 legs at the same time. Do not felt one completely then do another one, you want to make sure they are going to be fairly even when you have finished.
If you have attached them well enough they should be firm. If you pull at them or push them to the side there should not be any gaps or too much movement.
Create The Pigs Nose/Snout
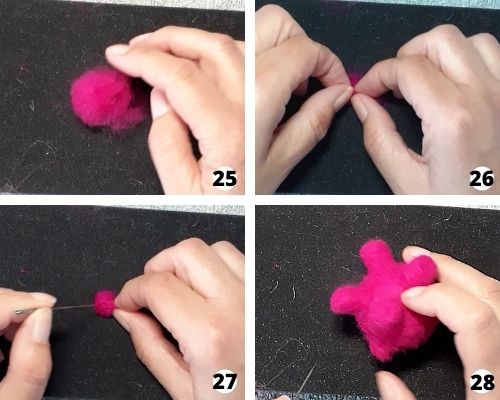
25. To make the nose pull a small amount of your colored wool.
26. Roll up as you did the body and make a tiny ball shape. It is a bit fiddly so be careful when you start to felt. Leave one side with un-felted wool to attach to the body as you did with the legs.
27. Felt the snout until fairly firm.
28. Position and attach the snout to the pig. Make sure it is centered between the legs and high enough up. Try to imagine where the eyes will be. If you attach the snout and find it is too small add small amounts of wool until you are happy with the shape.
Creating And Attaching The Ears
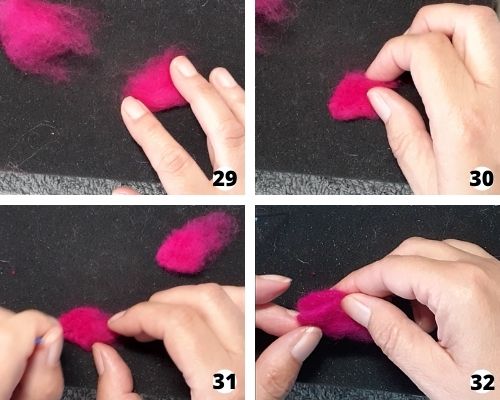
29. Pull enough colored wool for two ears. The ears are two triangles with one end left un-felted to attach to the pig.
30 & 31. Shape your pieces into two triangles. Turn in the edges to make the edges of the ears smoother. Again felt the two parts at the same time swapping between the two to make sure they are even.
Tip: Flatter felted pieces need turning frequently so they don’t felt to the mat. Go gently and don’t felt too deeply to limit this from happening.
32. Check your ears are the same size and thickness. If not adjust them to make sure they are.
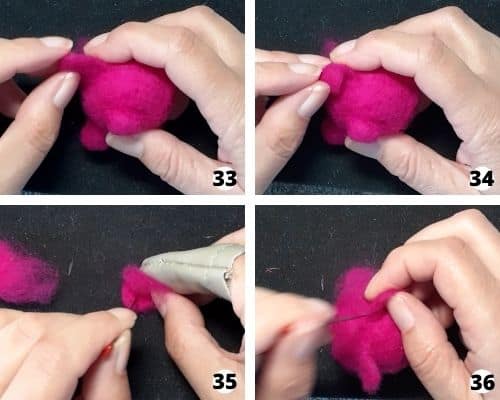
33. Position the ears. As a rough guide the ears should form a triangle to the nose. The should also be aligned straight between each ear.
34. Think about the overall look of your pig. Do you want straight ears or bent ones like this. If you want bent ears (or just one ear) you need to felt it into a bend.
35. To do this you can bend the ends of the ears over and gently felt the edges to create a slight bend.
36. Felt the eats onto the pig making sure you felt both the back and the front. Check you are happy with the alignment of the ears. Now felt until the ears are firmly attached.
Felt The Pig’s Eyes
Put on the eyes last after you have attached the legs, nose and ears. You don’t have to felt them; you can use plastic eyes if you prefer. However, this is an opportunity to start to learn part of 2D felting so it’s worth giving it a go.
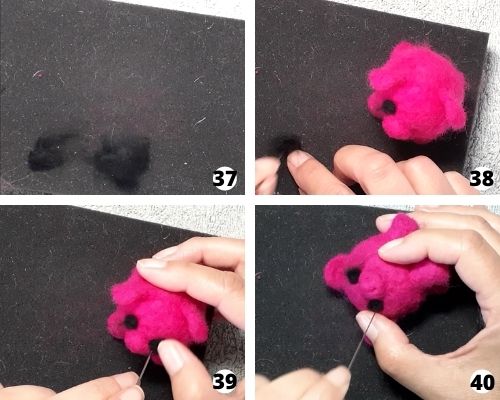
For the eyes, you need black wool and a small amount of white. If you don’t have white you can use some spare core wool. White is better but it’s only a small amount.
37. The aim is to create two even ovals with the black wool. You only need a tiny amount of wool and it’s easy to get too much.
Pull two amounts of wool as evenly as possible.
38. Felt your shape as best you can on your felting mat. You only need a rough shape as you need to be able to put the eyes on the pig. Position the first eye in line with the ears and nose.
39. Position the 2nd eye similar to the 1st eye but making sure it is lined up with eye one. Check you are happy with their location before felting fully.
40. Felt the eyes in place. Make sure all the rough edges are felted in so your eye is a smooth circular or round shape.
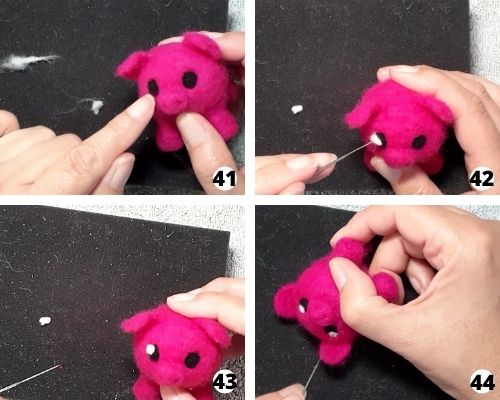
41. Decide where you want the eye reflection and how big. I decided to put it at the top. To start with I wanted it at the bottom but it didn’t look right. Your pig might be different as each thing you make is unique.
42. Take two tiny pieces of the same size white wool and roll between your fingers. Position one onto the black of the pig’s eye. Lightly felt it onto the pig.
43. Check your positioning and if you are happy with how it looks. Adjust if needed.
44. Position the other eye and felt both eyes firmly onto your pig.
Pigs Tail
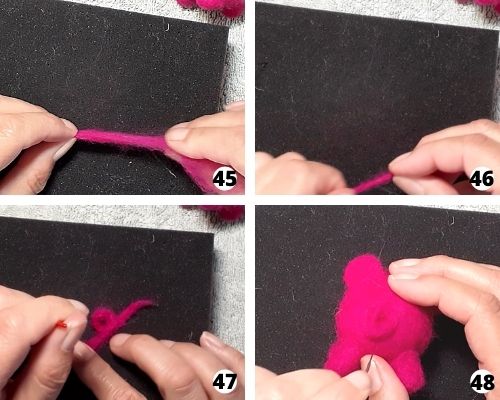
45. Pull out a strand of wool and pull out so that it is long and thin.
46. Felt the long strand to create your tail. Keep turning it regularly so it doesn’t stick to the surface of your mat.
47. Put a twist into the tail and quickly pin with your felting needle.
48. Position the tail how you want it onto your pig and felt it on. Check Truffles over for any last minute changes.
Well Done! Truffles is now complete.
***
