Felting is fun. However, it can be really frustrating when it goes wrong and your work is all fuzzy and does not turn out how you wanted. As you learn good techniques this will happen less frequently however it’s a good idea to know why it is happening to prevent it and how to de-fuzz your needle felted piece if it is already fuzzy.
To de-fuzz, your needle felt piece while you’re working there are several things that you can do. What you do depends on your problem. If you haven’t worked it enough you need to work it more, if you have you just need to finish your felted piece off. If you want to avoid issues in the future it comes down to the wool you use, the needles the time you take, and your technique. Below, I share some of the findings I learned while I was researching how to needle felt with good technique so you don’t have this issue and how to sort it if you do.
It’s not as actually as difficult as it looks and simply taking the time and effort to learn will improve your pieces 100%. Observation is key because if you can’t see your mistakes you can’t correct them.
How to Defuzz Needle Felted Piece
You’ve made your first piece of needle felting and your cute little animal, cactus, or tree is staring back at you all fuzzy. To begin with, you are over the moon because it’s the first piece you created. Then you realize that it just doesn’t look good up against everyone else’s work.
This is perfectly natural after all we all start out as beginners and it’s a learning process and a very detailed skill. No biggie the only way to learn is to recognize what your mistake is and that first piece will always be very special.
But now it’s time to improve and you look at your fuzzy little creature and smile, but know that he could look so much better. so what do you do?
Here’s How to Sort It and Defuzz Your Needle Felted Piece:
If you have a needle felted piece that you have already made and you think you need to de-fuzz it you need to do the following:
Check your piece to see if it really does need to have the fuzz removed.
There are a couple of things to look out for here.
Problem 1 – Your Felted Piece Isn’t Firm Enough.
How to Tell.
Squeeze it gently. If it’s under felted it’s really soft and squidgy and caves into your fingers. If this is the case then you probably haven’t worked it enough. Although different amounts of firmness are required for different things you should be able to tell if it’s too soft.
The Solution for a Floppy Fuzzy Felted Item
The solution here is simple. Take a larger size needle (or mid sizes multi needles) (smaller numbers on the needle) and continue to work your piece all over until it becomes much firmer. (See techniques below). If the needle is too big you will start to feel resistance and your piece will scrunch as you work.
Make sure you keep your needle really straight because you don’t want it breaking in your piece of felt.
Then swap to a smaller needle saying mid-size needle and continue to felt your piece. You don’t need to felt too deeply now. Occasionally squeeze it to see if it is as firm as you would like if not continue to felt it.
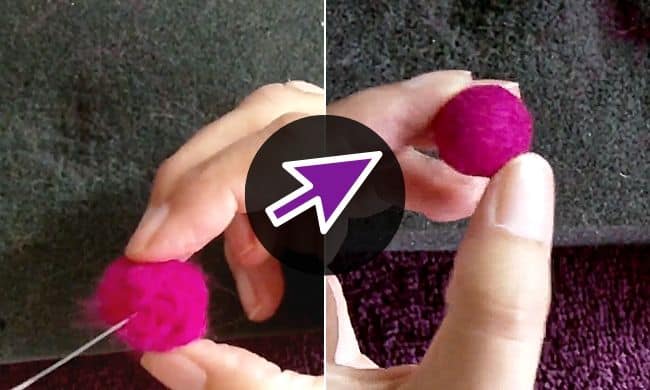
If you look at the bear on the right you can tell that it is firmly felted. When I squeeze it there is very little give in movement.
Problem 2 – Your Felted Piece Is Really Firm But Still Has Bits Of Wool Sticking Out
How to tell
If you’ve already tested it for firmness as above and it passed that test then under felting is not the issue.
Hold your felted item up and have a look at it you should be able to tell if the wool is sticking out.

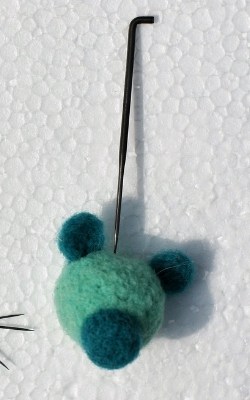
If you look at the picture of my mouse you can see he is still very fuzzy. In fact, no matter how hard I made his core body he still had bits of wool sticking out. This is only a problem if you don’t want it.
Solutions for Bits of Wool Sticking Out
- You’ve already worked it enough as its firm. You can try to go down a needle size to strengthen the firmness on the surface and just lightly felt it.
Depending on the wool you’ve used this may not work. If you look at the mouse in this example, it didn’t matter how hard I felted it, it simply would not lose that fuzzy exterior. Which works well with some pieces and not with others. - So the solution here would be for the future would be to not use that type of wool if you want a smoother finish. I was just experimenting at the time I made them out so it didn’t really matter.
- If you really don’t like it you can trim it.
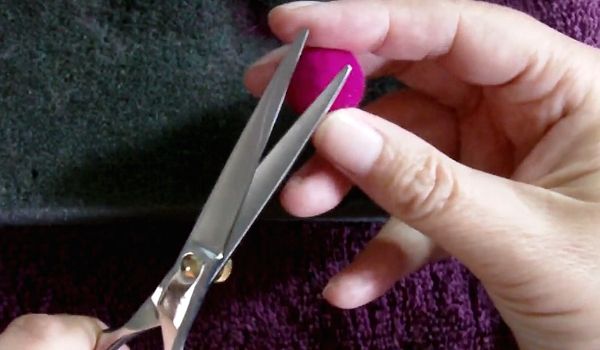
If you are happy with how firm your work is (see the section on creating firmness to avoid fuzzy wool) you can trim the stray fibers. To trim your work use a very sharp pair of scissors. Make sure they are suitable for wool. Gently go over the surface of your work and remove any loose or sticking up bits of fiber from your work. Be very careful as it is easy to clip your actual work with scissors.
- Some people also recommend lightly going over the surface with warm water. I think this works for some people. It’s not a technique I like to use on needle felting as it’s more along the lines of wet felting. I prefer to get the technique right from the beginning, so I don’t have the issue.
For future pieces of felting if you look below I’ve also included what to do to prevent these issues from happening in the future with new pieces of felt.
How to Improve Your Technique to Avoid Needing to DeFuzz Your Felted Items
Before you make another piece make sure you learn some basic techniques to get your basic shapes. I didn’t know to do this when I started and I would just scrunch up a piece of wool and stab like crazy, not a good technique although it works fine you can do it that way but it is better if you can make little balls or tubes, etc. – Not to mention faster!
Don’t simply scrunch up your wool and stab like crazy. This leaves the air in your work and takes longer to felt.
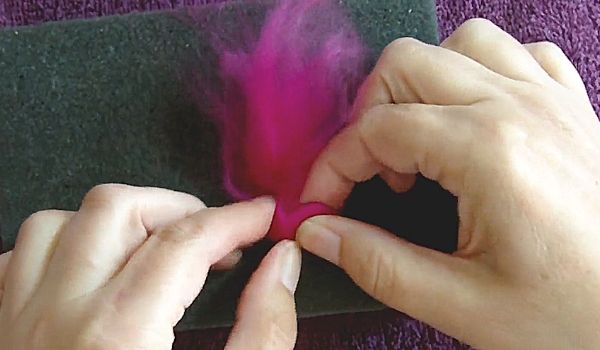
Instead, tuck and roll your work to start with a tighter ball, tube, etc.
This will make a firmer piece with reduced fuzzy bits.
Next is to make sure that you are making your pieces firm enough as this will help to de-fuzz them. This is just a matter of practice and shaping. Keep stabbing until your piece is fairly firm but not too firm if you are using core wool. As I say you’ll need to be able to stab into it with the colored wool. This also applies if you want to add pieces to each other. In the case of my mouse above he will always be a bit fuzzy because he is using rougher wool and will not be covered.
As your pieces felt down they will feel crunchy every time the needle goes in them. When this happens if you’re still not happy with your finish you can then downsize your Needle so that your piece becomes much finer. As it firms up your fuzzy look will reduce and finally become smoother and look firm and solid.
Stab your needles family and hard and deeply. But to begin with, do not stab too quickly because a lot of people bend needles when removing them as this can break them. It’s better to get your technique and then work up your speed.
What Wool Have You Used?
The finish you get can be determined partially by the wool that you use. If you use a fine or wool you will get a finer finish. Some wools are designed to look fuzzier which works really well if you’re creating a teddy bear or something similar. Some wools are rougher than others so they’re not going to end up with such a smooth finish.
However, having said this from what I’ve seen a lot of the problems come down mostly to a poor technique.
Improve Your Needle Felting Technique To Reduce The Need to DeFuzz
The technique is that you use and how precise you are can make a huge difference to your overall finish.
If you’re making a larger piece it’s a good idea to start with a center using core wool this is because it’s perfectly designed to do the job of shaping your inner work. This will give you a really good base in which to place your outer wool to make your finish firm and neat.
The main things that I’ve seen are simply that people new to needle felting get the basic shape but they do not felt down enough?
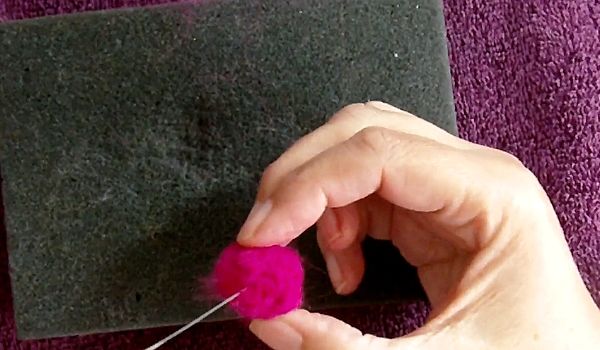
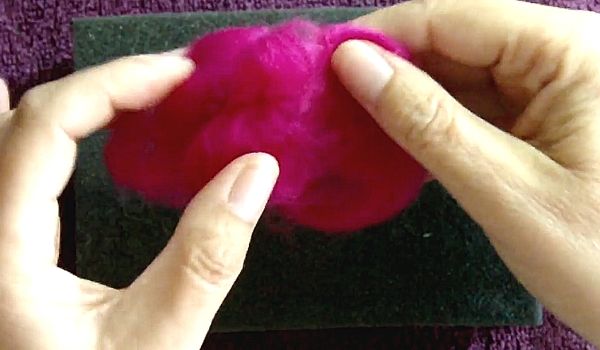
The ball in the image above is nowhere near done.
You can see the softness of it.
The wool is clearly still fuzzy.
And if you squish it your fingers will sink into the ball and it will flatten down.
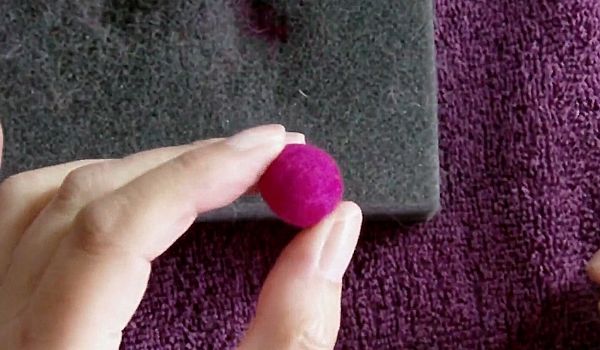
You can see from this image that the ball is much firmer.
It is smoother and more like a ball.
There are still some fuzzy bits around the edges.
Take a good look at the piece that you’ve already done and try to be objective. It may be that just the outside of your work is fuzzy or that the whole pieces aren’t felted enough. You’ll be able to tell if a whole piece isn’t felted enough because it’ll be sloppy and wobbly and move about a lot. Just wiggle it and squish it. If just the outside isn’t felted enough then all you need to do is some more work. If the whole thing is wobbly then you need to felt it until it firms up.
The first one is easier to put right than the second, but don’t get disheartened it’s easy to do another piece and before you know it everything will be nice and firm. Then you’ll be wondering how to get fuzzy lol.
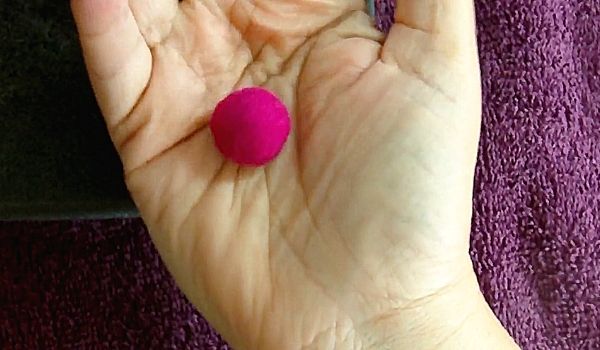
When you have finished you should be looking at a firmly felted piece.
You should not be able to squish it too much.
It should have few if any loose fibers.
It doesn’t have to be rock hard.
The method that you use while actually working can also make a difference. Each of the needles is designed to do a specific task.
There are lots of tutorials on YouTube on good needle felting techniques.
Needles
The needles that you use are important for how fast your felting takes shape. What type of needles you use can be down to personal preference. They are designed for specific tasks. If you use the correct size and type of needles it will make life a lot easier and your finished piece will look a lot more, well, finished.
Start out with a larger needle with more barbs along with it the core wool that we’ve already suggested and worked your piece until it’s firmish but not completely firm because you need to be able to continue to work on it once you put on your color felt this will give you a good quality center so the outside is not going to be so fuzzy.
Take Your Time
Needle felting is quite a slow process while there are techniques that you can use to speed it up you do need to put a lot of time into your work at. As I said above often work isn’t actually finished when people think it is let’s simply about putting in more time and more effort. to start with you really don’t know what you’re looking for is just a matter of experience it’s a good idea to look at other people’s work in comparison to see if you finished or not.
Maybe you want that Fuzzy Look?
Of course, it may be that you want that fuzzy look. Some people’s work always looks fuzzy. That is their style. But underneath the fuzzy is a firm well-felted piece of work on this comes from experience and experience, of course, come from practice.
So What Now?
I think the best way to get your piece firm and to de-fuzz it, is to start with a firm core to do that you learn the basic techniques which you can find on YouTube videos.
If you have a piece of work that you love and you still feel you want to de-fuzz it then you will need to work on it further using some of the tips from above.
Keeps stabbing deeply and shaping it until you’re happier with it. And then go down a needle size to fine-tune your work.
If you have any other comments or questions please let me know because this will help everyone.
